In today’s fast-paced digital age, it’s almost required that we work more efficiently while utilizing technology to solve complicated problems. And no computer program does a better job of that than Microsoft Excel.
First introduced in the mid 1980s, many business experts consider Microsoft Excel one of the greatest pieces of software ever developed — in 2013, PCMag called it “the first and only choice for manipulating numeric data.” And with huge chunks of the modern digital economy now reliant on the program, mastering its intricacies is a surefire way to boost productivity, enhance efficiency, and impress co-workers and employees.
Given its prominence in the software world, there are countless ways to turbocharge your Microsoft Excel experience, some of which are baked directly into the program’s interface and some of which are available as add-ins and plug-ins. And since nobody ever said Microsoft Excel was easy, we’ve collected our favorite strategies for improved performance.
1. Navigate Microsoft Excel like a pro.

Sure, a mouse and a trackpad are standard fixtures on most modern desks. But if you want to really supercharge your use of Microsoft Excel, learn keyboard shortcuts. For instance, holding down Ctrl while tapping the up, down, left, or right arrows will select every cell all the way to the end of the sheet. Flip through worksheets by holding Ctrl while pressing either Page Down or Page Up. Turn a range of numbers into currency, complete with a dollar sign and two decimal places, by pressing Ctrl + Shift + $ at the same time. You can also turn a number into a date (day, month, and year) by pressing Ctrl + Shift + #.
2. Apply similar formatting to multiple sheets at the same time.
This critical task is a breeze with Excel’s grouped worksheets feature. Click the tabs of the sheets you want to group together while pressing Ctrl and they’ll all turn white; while the sheets are grouped, any formatting entered on one sheet also shows up in the others. After formatting grouped sheets, make sure to click on Tabs to ungroup them before entering or removing data.
3. Insert Microsoft Excel data into Microsoft Word or PowerPoint.

If you’ve ever tried this before, you might laugh. But transferring data from a spreadsheet to a text document is possible. Just be careful to click the clipboard that shows up after you paste to decided whether you’d like to keep the original Microsoft Excel formatting or have the pasted data match the format of your existing Word or PowerPoint document.
4. Simply select columns and rows.
If your data is in a table and you need to refer to an entire column in a new formula, click on the column name. (Pro tip: make sure your cursor looks like a down arrow before you click on the column name.) Other handy selection shortcuts include Shift + Spacebar, which selects an entire row, and Ctrl + Spacebar, which selects an entire column.
5. Insert rows and columns with ease.
A good Excel spreadsheet is always ready to grow. Quickly adding rows and columns can be done in a variety of ways: clicking Insert > Rowsor Columns; right-clicking on rows or columns and choosing Insert; or pressing the Ctrl and + or Ctrl + Shift and +
6. Turn columns into rows (or vice versa).

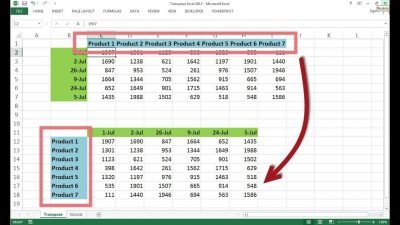
If you have data organized into columns that needs to be converted into rows (or the other way around), don’t worry. Copy the original block of cells, then right-click on the destination cell and select Paste Special,then Transpose.
7. Use simple calculations to save time and energy.
Excel’s formulas can be legendary for their complexity, but simple calculations can often give you the most immediate boost in productivity. To add, use the + key; to subtract, use the – key; to multiply, use the * key; and to divide, use the /
8. Add a summary row to a table.
You can add a summary row to a table in the Design ribbon (using Windows) or the Table ribbon (on a Mac) by checking Total Row. You can then choose from a variety of summary statistics: not just total sum but total count, average, standard deviation, more. Placing the info in a total or summary row means it’s attached to your table but will stay in the bottom row regardless of how you then might choose to sort your table data. This can serve as a huge timesaver if you’re doing lots of data exploration.
9. Use AutoFill.
This works great for repetitive tasks: filling in dates, times, or other values that follow a sequence. Start with the first entry, then move the cursor over the lower right section of the final cell, which brings up a fill handle. Once it changes to a plus (+) sign, click and select all the cells you need to fill with your chosen pattern. You can even go up a column or left and right on a row.
10. Hide data in protected worksheets.
If you want to share some data with other users but not all of it, consider hiding it. The easy way is to right click and select the Hide function. But you can be even safer by using the Format Cells function by clicking Home > Font > Open Format Cells > Number Tab > Custom > Type. That way, your data can stay truly safe.
Whether you’re a seasoned Microsoft Excel pro on the hunt for fresh usability tricks, or a new user scrambling to make sense of it all, these tips should beef up your program experience. Want to know more about the Microsoft Office productivity suite? Curious whether your office is ready for an upgrade that makes your technology life more productive and efficient? Contact Chipin Hassle Free IT Solutions today. We’re here to make hardware and software work for your business, not against it.
For more IT tips visit our blog www.chipin.ae/blog


